
'Slaying the Bazelisk' - Adventures in Modularity, Build Systems, and SPM Integration
Over the past two months I’ve been working on my third iOS application, Hacksy. It’s a HackerNews reader with functionality that I always missed in the readers that I used. However, along the way I realized that - apart from implementing some cool features - this project can be expanded to a large-scale modular architecture. One might ask, who in their right mind would do such thing for a side project? The answer is me. Building apps is cool and I love it, but after your second or third app, you’re kind of falling on similar patterns and I like a bit of a challenge, especially within the domain that I already have some experience in. Also, I love complicating my life, so there’s that.
The challenge that I set for myself quickly spiraled out of control and I started to think about additional layers of complexity. Splitting my app into feature modules wasn’t enough anymore and I decided to employ a build system that would neatly tie this thing together. The build system that I chose? Google’s Bazel. The reason for going with that particular build system wasn’t accidental, as I was briefly exposed to it in 2022 during my first iOS internship.
Meeting Advanced Architecture, Bazel, and Dealing with Dependency Containers
Back in 2022 I got admitted to a tech internship program in one of the biggest e-commerce platforms from where I come from. Obviously, I joined the iOS branch, which was huge. There were separate teams working on each feature of the app, the whole thing was heavily modularized, and there were still remnants of Objective-C code in classes that spanned almost ten thousand lines. In general a very overwhelming experience. Picture this, you think you’re a hot-stepper, because you built an app, have a relatively good grasp on the subject matter and then you realize that there are levels to this domain that you didn’t even think were possible. In other words, your skills in app building are kind of “useless” in this scenario. What I mean is this: it’s not a startup setting where you focus on delivering new functionality almost on a daily basis and you’re immersed in Apple’s frameworks to deliver the most visually pleasing experience ever that people will love and download your app in droves. A big, established app already has most of the required features in place, and adding new functionality is a result of months of collaborative work of multiple levels in the organization. But I’m digressing too much.
I was assigned to a team whose sole responsibility was making sure that the developer experience was as smooth as possible. Basically, the team built advanced tools in Swift that were supposed to streamline the integration of new modules (features) and ensure that the whole pipeline: from adding new modules, to integrating them to the main app was as frictionless as possible. This meant that I had to get up to speed with complex systems, and I had to do it fast. UIKit or SwiftUI weren’t even close to my biggest issues back then. What really made me lose sleep were two things: dependency containers and… Bazel. Dependency containers? you might ask. Yes, as the mechanics of using them in a large-scale app are a bit different to “regular” dependency injection practices. Later, you’ll see how Bazel comes into all of this and ties it together, but first a brief introduction to modularity.
So, What is the Issue Here?
Consider the following problem: you were tasked with building some new module for the app. For example, a re-vamped Settings screen. The settings screen, although new, would re-use some already existing components that were implemented in another (external) module. So, to use these components, you’d simply make that external module the dependency on your new settings module, correct? Nope. That approach drags in an entire module full of unneeded functionality. A great, visual example here would be the following: Imagine that you want to display some loyalty points that a given user accumulated over time, in a UITableViewCell that would be part of your SettingsViewController. You can get that particular information from the feature module called LoyaltyPoints. But LoyaltyPoints is a massive module that implements other functionality, like LoyaltyPointsOfferViewController, which lists all the offers available to the user with a given number of loyalty points. You don’t want that in your SettingsViewController, as that would bloat your module with unnecessary dependencies. Each additional dependency expands your module’s transitive dependency graph, i.e., the set of all modules that must be available at build time. This not only increases build complexity but also raises the risk of creating circular dependencies that can make your codebase fragile and difficult to maintain. So, what is the solution here?
The answer is: creating a corresponding public module that defines the protocols (interfaces) your module needs, without depending on concrete implementations. This inverts the dependency. Instead of SettingsViewController depending directly on another feature’s implementation details, it depends only on abstract protocols. The private module then implements these protocols. This keeps your module’s dependencies minimal and enforces clean architectural boundaries.
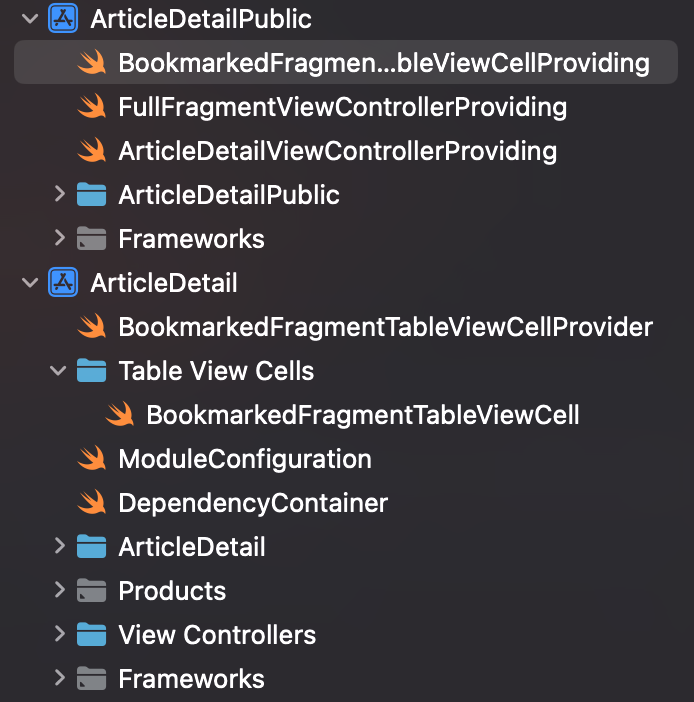
The screenshot above shows an example of these mechanics in action. The private module ArticleDetail contains the concrete implementations, while the corresponding ArticleDetailPublic module defines the protocols that other modules depend on. What’s particularly interesting is the BookmarkedFragmentTableViewCell example. The file in the “Table View Cells” directory contains the full implementation of a custom UITableViewCell, while BookmarkedFragmentTableViewCellProvider acts as a factory that handles cell registration with the table view. The provider conforms to BookmarkedFragmentTableViewCellProviding - a protocol defined in the public module. Other modules that need this cell type depend only on the BookmarkedFragmentTableViewCellProviding protocol, not the concrete provider or cell implementation. Note the flexibility of this approach: you can modify the cell implementation, swap out the provider, or even provide entirely different implementations (as long as they conform to the protocol, dependent modules remain unaffected). The consuming code is completely decoupled from implementation details.
At this point you might be wondering: “Ok, I get the protocol/provider pattern, but how do modules actually get these providers? How does a module obtain an instance of something conforming to BookmarkedFragmentTableViewCellProviding?” This is where dependency injection comes in. Being completely honest, this pattern was so confusing to me in the beginning that I just didn’t know where to start, because the questions in my head kept piling up with no answers.
Registration, Resolution, Usage
So, let’s clear up the confusion from the paragraph before. Starting with “where do I register things so that other modules can use them?” You probably noticed in the screenshot that the ArticleDetail module has a ModuleConfiguration.swift file. Each private module contains this configuration file, which serves two purposes: first, it registers the module’s implementations (the concrete types that fulfill the protocols defined in its public module), making them available to other modules that need them. Second, it resolves and stores the dependencies this module needs from other modules. Think of it as a two-way contract: “Hey, here’s what I bring to the table (i.e., provide to the app), and here’s what I need from other modules to function.” Here’s what this looks like in the ArticleDetail module:
public final class ModuleConfiguration: ModuleConfiguring {
    public static func registerImplementations(in container: any ModuleKit.DependencyRegistering) {
        container.register(ArticleDetailViewControllerProviding.self) {
            return ArticleWebViewControllerBuilder()
        }

        container.register(FullFragmentViewControllerProviding.self) {
            return FullFragmentViewControllerBuilder()
        }

        container.register(BookmarkedFragmentTableViewCellProviding.self) {
            return BookmarkedFragmentTableViewCellProvider()
        }
    }
    // ...
}
ArticleDetail ”gives” these three building blocks to the app (including our table view cell discussed before).
ArticleDetail needs a provider that conforms to CommentsViewControllerProviding protocol:
// *Continuing in ModuleConfiguration.swift*
public static func resolveDependencies(with resolver: any ModuleKit.DependencyResolving) {
    guard let commentsViewControllerProvider = resolver.resolve(type: CommentsViewControllerProviding.self) else {
        assertionFailure("No Comments View Controller Provider found!")
        return
    }

    DependencyContainer.default.commentsViewControllerProviding = commentsViewControllerProvider
}
The resolveDependencies method is where the module declares its external dependencies, basically saying “I need these components from other modules to function properly.” These resolved dependencies are stored in the module’s DependencyContainer, which acts as an internal registry that components within the module can access. Here’s the DependencyContainer for ArticleDetail:
import Foundation
import CoreKit
import DiscussionPublic // *We need to import that module to obtain the*
                        // `*CommentsViewControllerProviding` protocol*

final class DependencyContainer {
    static let `default` = DependencyContainer()
    var commentsViewControllerProviding: CommentsViewControllerProviding!
}
The container is a simple singleton that holds references to the external dependencies this module needs. When resolveDependencies runs during app initialization, it populates these properties, making them available throughout the module’s internal implementation.
Using the component is very simple. In your implementation code for ArticleDetail you’d simply call DependencyContainer.default.commentsViewControllerProviding whenever you needed to use that element, and then you’d call
the method that the conforming type must implement to use the actual implementation. Here’s an example of that:
@objc private func presentComments() {
    let commentsViewControllerProviding = DependencyContainer.default.commentsViewControllerProviding
    let commentsViewController = commentsViewControllerProviding?.createCommentsViewController(article: article)

    // *rest of the code*
}
commentsViewControllerProviding is of type CommentsViewControllerProviding, so we cannot plug this in straight away in our code, as that’s just a protocol. But, we do know that CommentsViewControllerProviding has a method that any conforming type must implement, and returns a UIViewController that can then be used to display it in the app:
public protocol CommentsViewControllerProviding {
    func createCommentsViewController(article: Article) -> UIViewController
}
This example demonstrates how the public/private module pattern with dependency injection creates highly decoupled code. Yes, there’s an initial investment in setting up the architecture and thinking through module boundaries, but the payoff is substantial: swapping implementations or modifying features no longer requires cascading changes across modules that depend on them. You change the implementation, and as long as it conforms to the protocol, everything continues to work.
I briefly mentioned Bazel in this section, but so far it is nowhere to be found. Let’s introduce it and, most importantly, explain how it ties to my incoherent ramblings about modularity. After all, Bazel was built for exactly these kinds of problems: making dependencies explicit and enforceable.
Enter Bazel
Before we connect the dots, let me shortly explain what Bazel is (though, keep in mind that it’s such an incredibly complex and extensive tool, that I won’t even dare saying that I understand even 1/100th of it.) Bazel is an open-source build system, originally designed to handle massive codebases. Google is known for having a massive “monolithic repository” (monorepo), so they had to come up with a tool that could handle managing billions of lines of code (and growing) that span across multiple platforms and hundreds of programming languages. At its core, Bazel treats a project as a graph of explicit targets. Each target is required to declare its sources and dependencies in a BUILD.bazel file. It’s up to you, as a programmer, to define those according to the needs of your target/module (once we get to the nitty gritty details, I will present snippets of those files that I created for Hacksy.) The dependency graph is known and checked at build time and it prevents “hidden” or accidental coupling. And I can tell you from my experience that Bazel is ruthless at enforcing strict module boundaries.
Bazel’s dependency graph goes hand-in-hand with one of it’s most important features: incremental builds. Basically, unchanged targets in your app are never rebuilt. Content-addressable caching mechanism ensures that only the module that changed is rebuilt without the overhead of rebuilding other modules. So, coming back to an earlier example of ArticleDetail: if I make a change in one of the implementations, Bazel only considers these changes when rebuilding the whole app. It’s an incredibly impressive system and later I will provide screenshots of build times for both the Xcode and Bazel. Let me just preface that by saying I cut the build times in half by using Bazel and we’re talking about a small-to-moderately sized application here, not some huge monorepo with thousands of modules.
Back to business. Why would I even do such thing? Being completely honest, there was no need for my app to implement such complex system. Literally zero reason. But my curiosity, stubbornness, and defiance to give up when not understanding something was just stronger. See, with my first encounter with Bazel and all of the things that I am writing about here, I failed. I just didn’t understand how to navigate this complex thing, what goes where, and why do I have to fight the tool rather than contributing to building the app. What also did not help was the fact that build systems are notoriously difficult to learn as they stand at an intersection of many subdomains in computer science (Systems Programming, Graph Theory, Operating Systems) and there is a lot of tacit knowledge required to implement them correctly. Funny how harnessing complexity requires introducing even more complexity, but let’s leave the philosophical discussions aside.
The fact that we don’t have to wrestle so much with the aforementioned problems when using Xcode, is a result of brilliant people at Apple putting effort to hide that complexity from iOS developers by making a lot of implicit assumptions. To give you an example: When firing up your project, you don’t have to think about adding UIKit or any other Apple-provided framework explicitly. It’s just there, waiting for you to write import UIKit. Whereas when using a build system like Bazel (or Meta’s Buck2), you are responsible for adding those frameworks yourself to the BUILD file. What you have to do is essentially rewire your thinking a bit, because you’re not managing files anymore, but a distributed computation graph. Something that’s rarely required of an iOS developer.
How I Migrated Hacksy to Bazel
With the modular architecture in place, I decided that it was now time to incorporate Bazel into the project. I noticed that the build times of my app were getting rather long, around 3 minutes. Not the end of the world, but I knew that it could be improved. This is how Hacksy workspace looked like before I decided to migrate the project to Bazel:
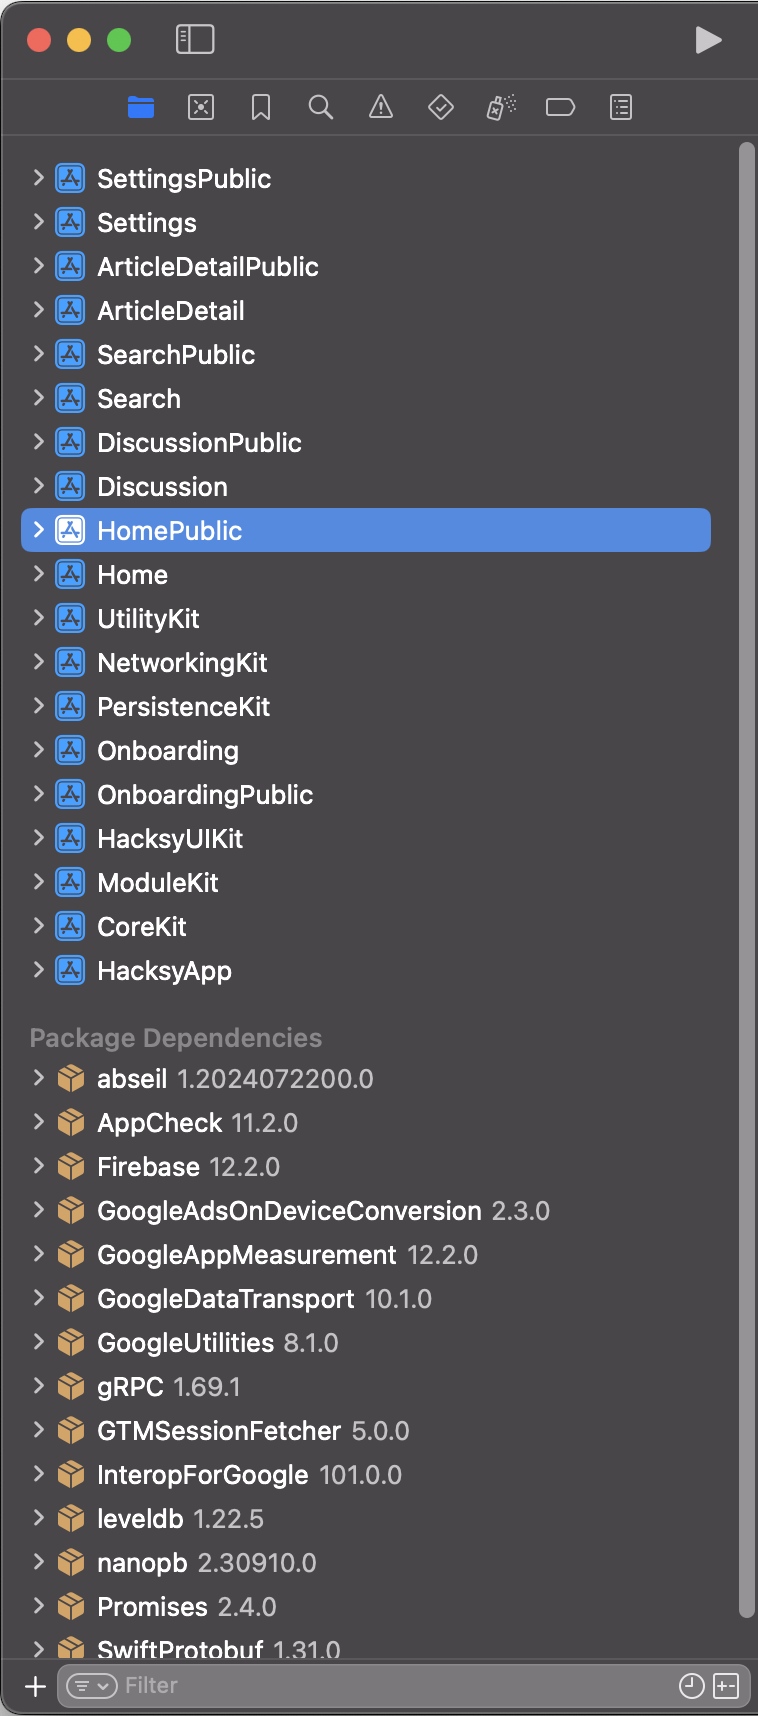
Everything is neatly compartmentalized into a separate framework that implements a given feature. As you can see, app features (screens) are divided into public/private modules, whereas the general purpose modules “stand on their own”, meaning they don’t have a corresponding public module. This presents itself nicely for a smooth migration to Bazel, correct? Unfortunately no, for many reasons.
Reason #1 - Incorrect Directory Structure
When you scroll back to the screenshot that I attached in the section about modularity, you’ll see that the files seem to be neatly organized into folders, such as “View Controllers”, or “Table View Cells”. While there is nothing inherently wrong with structuring your projects like this; the approach does not lend itself nicely for Bazel. It can be done this way, but it’s much more painful and error-prone. When you take a look at Bazel’s GitHub repository and the examples that are there, you’ll see that all of those projects are neatly divided into “Sources” and “Resources” directories. And for a good reason. It enforces a clear structure for a module and you’re less likely to make an error in a BUILD file for a target. Inside the “Sources” directory, you can put any folders containing .swift files as you like. What matters is that there is a single directory with those files—not multiple—as was the case with the Hacksy codebase I displayed above. Here’s the correct structure in the re-architected version of Hacksy:
├── Search
│   ├── BUILD.bazel
│   └── Sources
│       ├── CommentSearchResultCellProvider.swift
│       ├── DependencyContainer.swift
│       ├── ModuleConfiguration.swift
│       ├── StorySearchResultCellProvider.swift
│       ├── Table View Cells
│       │   ├── CommentSearchResultCell.swift
│       │   └── StorySearchResultCell.swift
│       └── View Controllers
│           └── SearchViewController.swift
├── SearchPublic
│   ├── BUILD.bazel
│   └── Sources
│       ├── CommentSearchResultCellProviding.swift
│       ├── SearchResultCellProviding.swift
│       └── SearchViewControllerProviding.swift
Reason #2 - Incorrect Top Level Target Directory Structure
Looking once again at the screenshot with the modules, it’s not clear (to Bazel) what is the main target that combines all of the modules together. A big mistake that I made, was to assume that I just need to add the BUILD and MODULE files to the root directory of Hacksy, and Bazel will figure out what is what. As is usually the case, reality brutally verified that claim and I was stuck not knowing how to proceed forward. Identically to reason #1, you have to provide a similar directory structure to the top level target. Only then Bazel will know how to proceed with your project. The way Hacksy was structured before, there was no clear definition of what the main target was. So, following from the previous example, here’s the structure for the HacksyApp top level target:
HacksyApp
├── Resources
│   ├── Assets.xcassets
│   │   ├── AccentColor.colorset
│   │   │   └── Contents.json
│   │   ├── AppBackground.colorset
│   │   │   └── Contents.json
│   │   ├── AppIcon.appiconset
│   │   │   └── Contents.json
│   │   ├── BrandPrimary.colorset
│   │   │   └── Contents.json
│   │   ├── Contents.json
│   │   ├── HackyIcon.imageset
│   │   │   ├── Contents.json
│   │   │   └── HackyIcon2.png
│   │   ├── HackyIconGlow.imageset
│   │   │   ├── Contents.json
│   │   │   └── HackyIconShadow.png
│   │   ├── HackyLogo.imageset
│   │   │   ├── Contents.json
│   │   │   └── HackyLogo2.png
│   │   └── SecondaryBackground.colorset
│   │       └── Contents.json
│   ├── Base.lproj
│   │   ├── LaunchScreen.storyboard
│   │   └── Main.storyboard
│   ├── GoogleService-Info.plist
│   └── Info.plist
└── Sources
    ├── AppDelegate.swift
    ├── HacksyAppCoordinator.swift
    └── SceneDelegate.swift
Reason #3 - SPM and Firebase
Now we’re coming to one of the biggest challenges that I faced when moving Hacksy to Bazel. I was looking for a solution for this for a week, experimented left, right, and center, but it was just not working out no matter what I did. It got to the point where I left this project completely dejected and started to look at alternatives that maybe were easier to implement, but those alternatives were just as frustrating, so I left it and came back to it after a moment.
The issue was that most of the solutions to having external dependencies (like Firebase) being added through Bazel were either relying on Cocoapods (which are unfortunately getting sunsetted) or the old ways of creating Bazel projects through WORKSPACE and not bzlmod. I did a lot of brainstorming with Claude about my approach and I got the following answer when I faced the issue:
Given Firebase’s current state with SPM and the FirebaseCoreExternal changes, you might want to question whether the build time improvements are worth the engineering overhead right now.
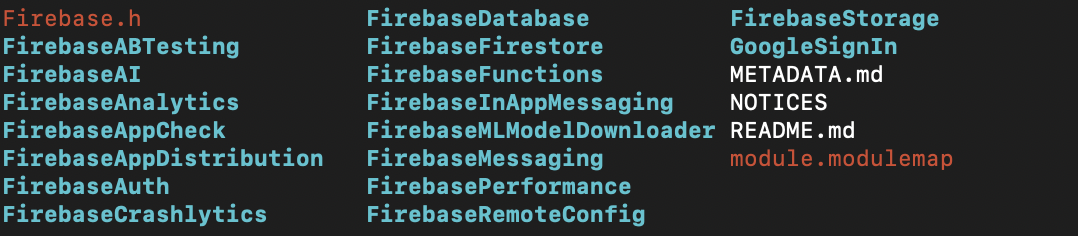
The FirebaseCoreExternal changes mentioned by Claude were a result of one of its suggestions to basically download the official release of Firebase and manually add the necessary dependencies to my project. While the suggestion was not completely wrong as it is one way to solve the problem, it fell short for a simple reason: due to the changes made in Firebase SDK, the Core module is not a part of the release that you download. There is FirebaseCoreExtension, but it’s not what I needed. If you are curious how the structure of unpacked Firebase release looks like, it’s this:
Although Claude was trying to veer me into a different direction and provided some solid arguments to change course, I’m always skeptical whenever AI produces an answer. Also, I just couldn’t believe that there is no way to integrate SPM (the de-facto current standard of bringing in packages in iOS projects) using one of the biggest build systems. Finally, after researching a bit more, I found rules_swift_package_manager (link to GitHub), a Bazel dependency that allows you to use SPM with Bazel. But, I encountered some problems with it. Not with the tool itself, but rather how to use it correctly. Given that I am dealing with a package manager, do I resolve the dependencies with SPM itself, or does Bazel take over the whole process? Initially, I just assumed that I simply add the rules_swift_package_manager dependency, pass the packages I want in my project, enter bazel run and I am good to go. That was of course a totally failed attempt. Firebase was fetched, but I couldn’t import it anywhere, Xcode was complaining that there is no such module as FirebaseCore, or FirebaseDatabase for that matter.
Making SPM and Bazel cooperate
The solution to this issue is to have SPM and Bazel work in tandem. Here’s how you do it: First, you declare a Package.swift at the root level of your project with the required dependencies. For me, the Package.swift looks like this:
// swift-tools-version: 5.9
import PackageDescription

let package = Package(
    name: "hacksybazel", // <- this has to match the name of the module in MODULE.bazel
    dependencies: [
        .package(
            url: "https://github.com/firebase/firebase-ios-sdk.git",
            exact: "12.3.0"
        )
    ]
)
Nothing out of the ordinary here. Next, you run swift package resolve, this creates a Package.resolved file. Now, these next steps are critical for the whole assembly to work. In your MODULE.bazel (declared at the root of your project), you add the dependency on rules_swift_package_manager and do the following:
module(
    name = "hacksybazel",
    version = "1.0.0",
)

bazel_dep(name = "apple_support", version = "1.22.1")
bazel_dep(name = "rules_apple", version = "4.0.1")
bazel_dep(name = "rules_swift", version = "3.0.2")
bazel_dep(name = "rules_xcodeproj", version = "3.0.0")
bazel_dep(name = "rules_swift_package_manager", version = "1.6.0")

swift_deps = use_extension(
    "@rules_swift_package_manager//:extensions.bzl",
    "swift_deps",
)
swift_deps.from_package(
    resolved = "//:Package.resolved",
    swift = "//:Package.swift",
)
use_repo(
    swift_deps,
    "swift_package",
    "swiftpkg_firebase_ios_sdk",
)
The important bits are the .from_package(...) and use_repo(...) calls. You pass both the resolved package file and the .swift file to give Bazel the info on what to fetch. What is really important in the use_repo(...) call is this line swiftpkg_firebase_ios_sdk. It is the alias (for a lack of a better word) that you use to embed Firebase as a dependency either in your whole project, or just one module. The official repository for rules_swift_package_manager states the following:
The name of the Bazel external repository for a Swift package is
swiftpkg_xxxwherexxxis the Swift package identity, lowercase, with punctuation replaced byhyphen. For example, the repository name forapple/swift-nioisswiftpkg_swift_nio.
All good, but we’re not done yet, as there are two missing pieces of the SPM puzzle. First, you need to decide where you want your dependency to live. I did not want Firebase to be added to the whole application for a very simple reason: only one module relies on it (NetworkingKit) and I wanted to keep the “separation of concerns” very clear. There is no need for CoreKit or HacksyUIKit (containing the common UI elements; colors) to know anything about Firebase. Here’s the BUILD file for NetworkingKit that brings in Firebase:
load("@rules_swift//swift:swift.bzl", "swift_library")

swift_library(
    name = "NetworkingKit",
    module_name = "NetworkingKit",
    srcs = glob(["Sources/**/*.swift"]),
    deps = [
         "//CoreKit:CoreKit",
         "//ModuleKit:ModuleKit",

         "@swiftpkg_firebase_ios_sdk//:FirebaseCore",
         "@swiftpkg_firebase_ios_sdk//:FirebaseDatabase",
         "@swiftpkg_firebase_ios_sdk//:FirebaseStorage",

    ],
    # omitted 'linkopts' and 'copts' for brevity
    visibility = ["//visibility:public"],
)
Great. Now there is just one last thing you have to do: run bazel mod tidy and hold your breath that everything goes well. You should see Bazel update the use_repo directives for your module extensions and a flood of information about (in this case) Firebase being fetched. After that you’re officially done and can freely import Firebase in your module!
Wrap Up - Results, Learnings, and Was it Even Worth It?
I’m not gonna lie, it took a lot of effort to migrate Hacksy to Bazel. In the internship that I mentioned in the beginning, I did not even scratch the surface of this tool. I knew what commands to run to build, and clean Bazel artifacts, but that was about it. My knowledge before tackling this project was almost zero. Bazel rang a bell, I knew what it does and some intuition about how it might benefit a large scale application, but not more. The rest was just trying to stitch the pieces from Stack Overflow, blog posts, and brainstorming with Claude. At some point it became clear to me that instead of trying to contort the already existing project (the screenshot of which you saw in the very beginning), it’d be much easier to start afresh, breaking down the complexity of the whole thing to the smallest pieces. So, I started with the small iOS tutorial on Bazel’s GitHub and step-by-step added the additional blocks that I needed. After that I did the same with my app, but before I recreated the exact same structure, I created a tool that greatly improved my “migration speed”. The tool is called bazel-modjool-gen and it simply generates modules for your existing iOS workspace. Adding new modules is a pretty time-consuming endeavor and it’s also error prone, as you not only have to be mindful of the correct directory structure, but also add those new modules to your main BUILD file. The tool does these things for you. Here’s how the project looks like after moving from the framework approach shown earlier to Bazel:
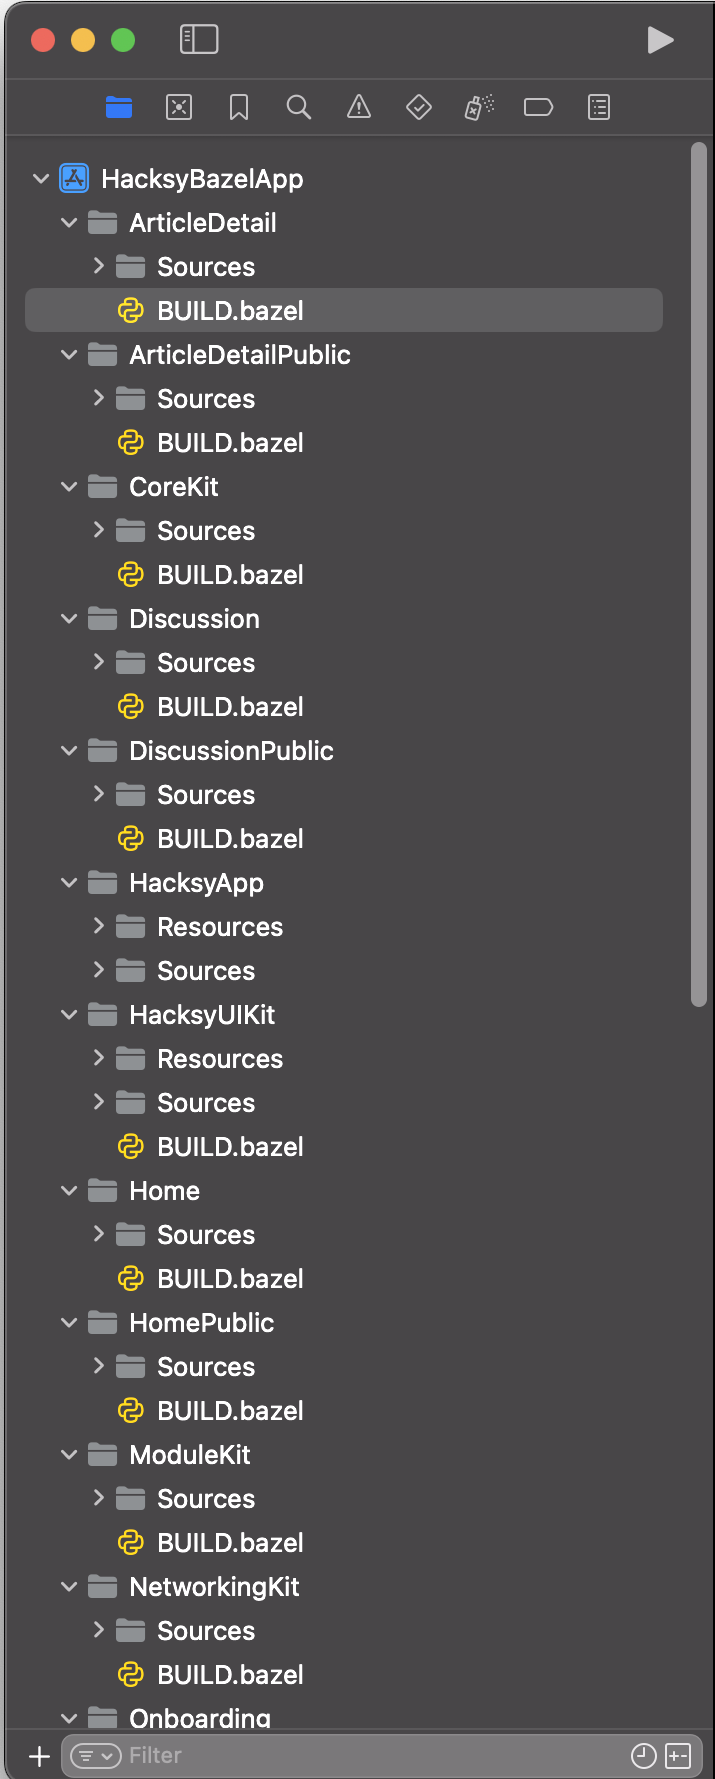
It’s really neat if you ask me!
Build Times - What Kind of Improvement Are We Talking About
Now, let’s talk numbers, because that is the real litmus test of this project. Here’s what I did to measure the time it took to build both the Xcode version and Bazel version and make sure to level out the playing field. First, in Xcode, I cleaned the build folder to simply check how long does it take to build the project “from the ground up”, so to speak. Then, I did the following: Product -> Perform Action -> Build with Timing Summary. That took quite a while on the first run, but it was to be expected, given that I just cleaned the build folder. Here’s the screenshot of that run:
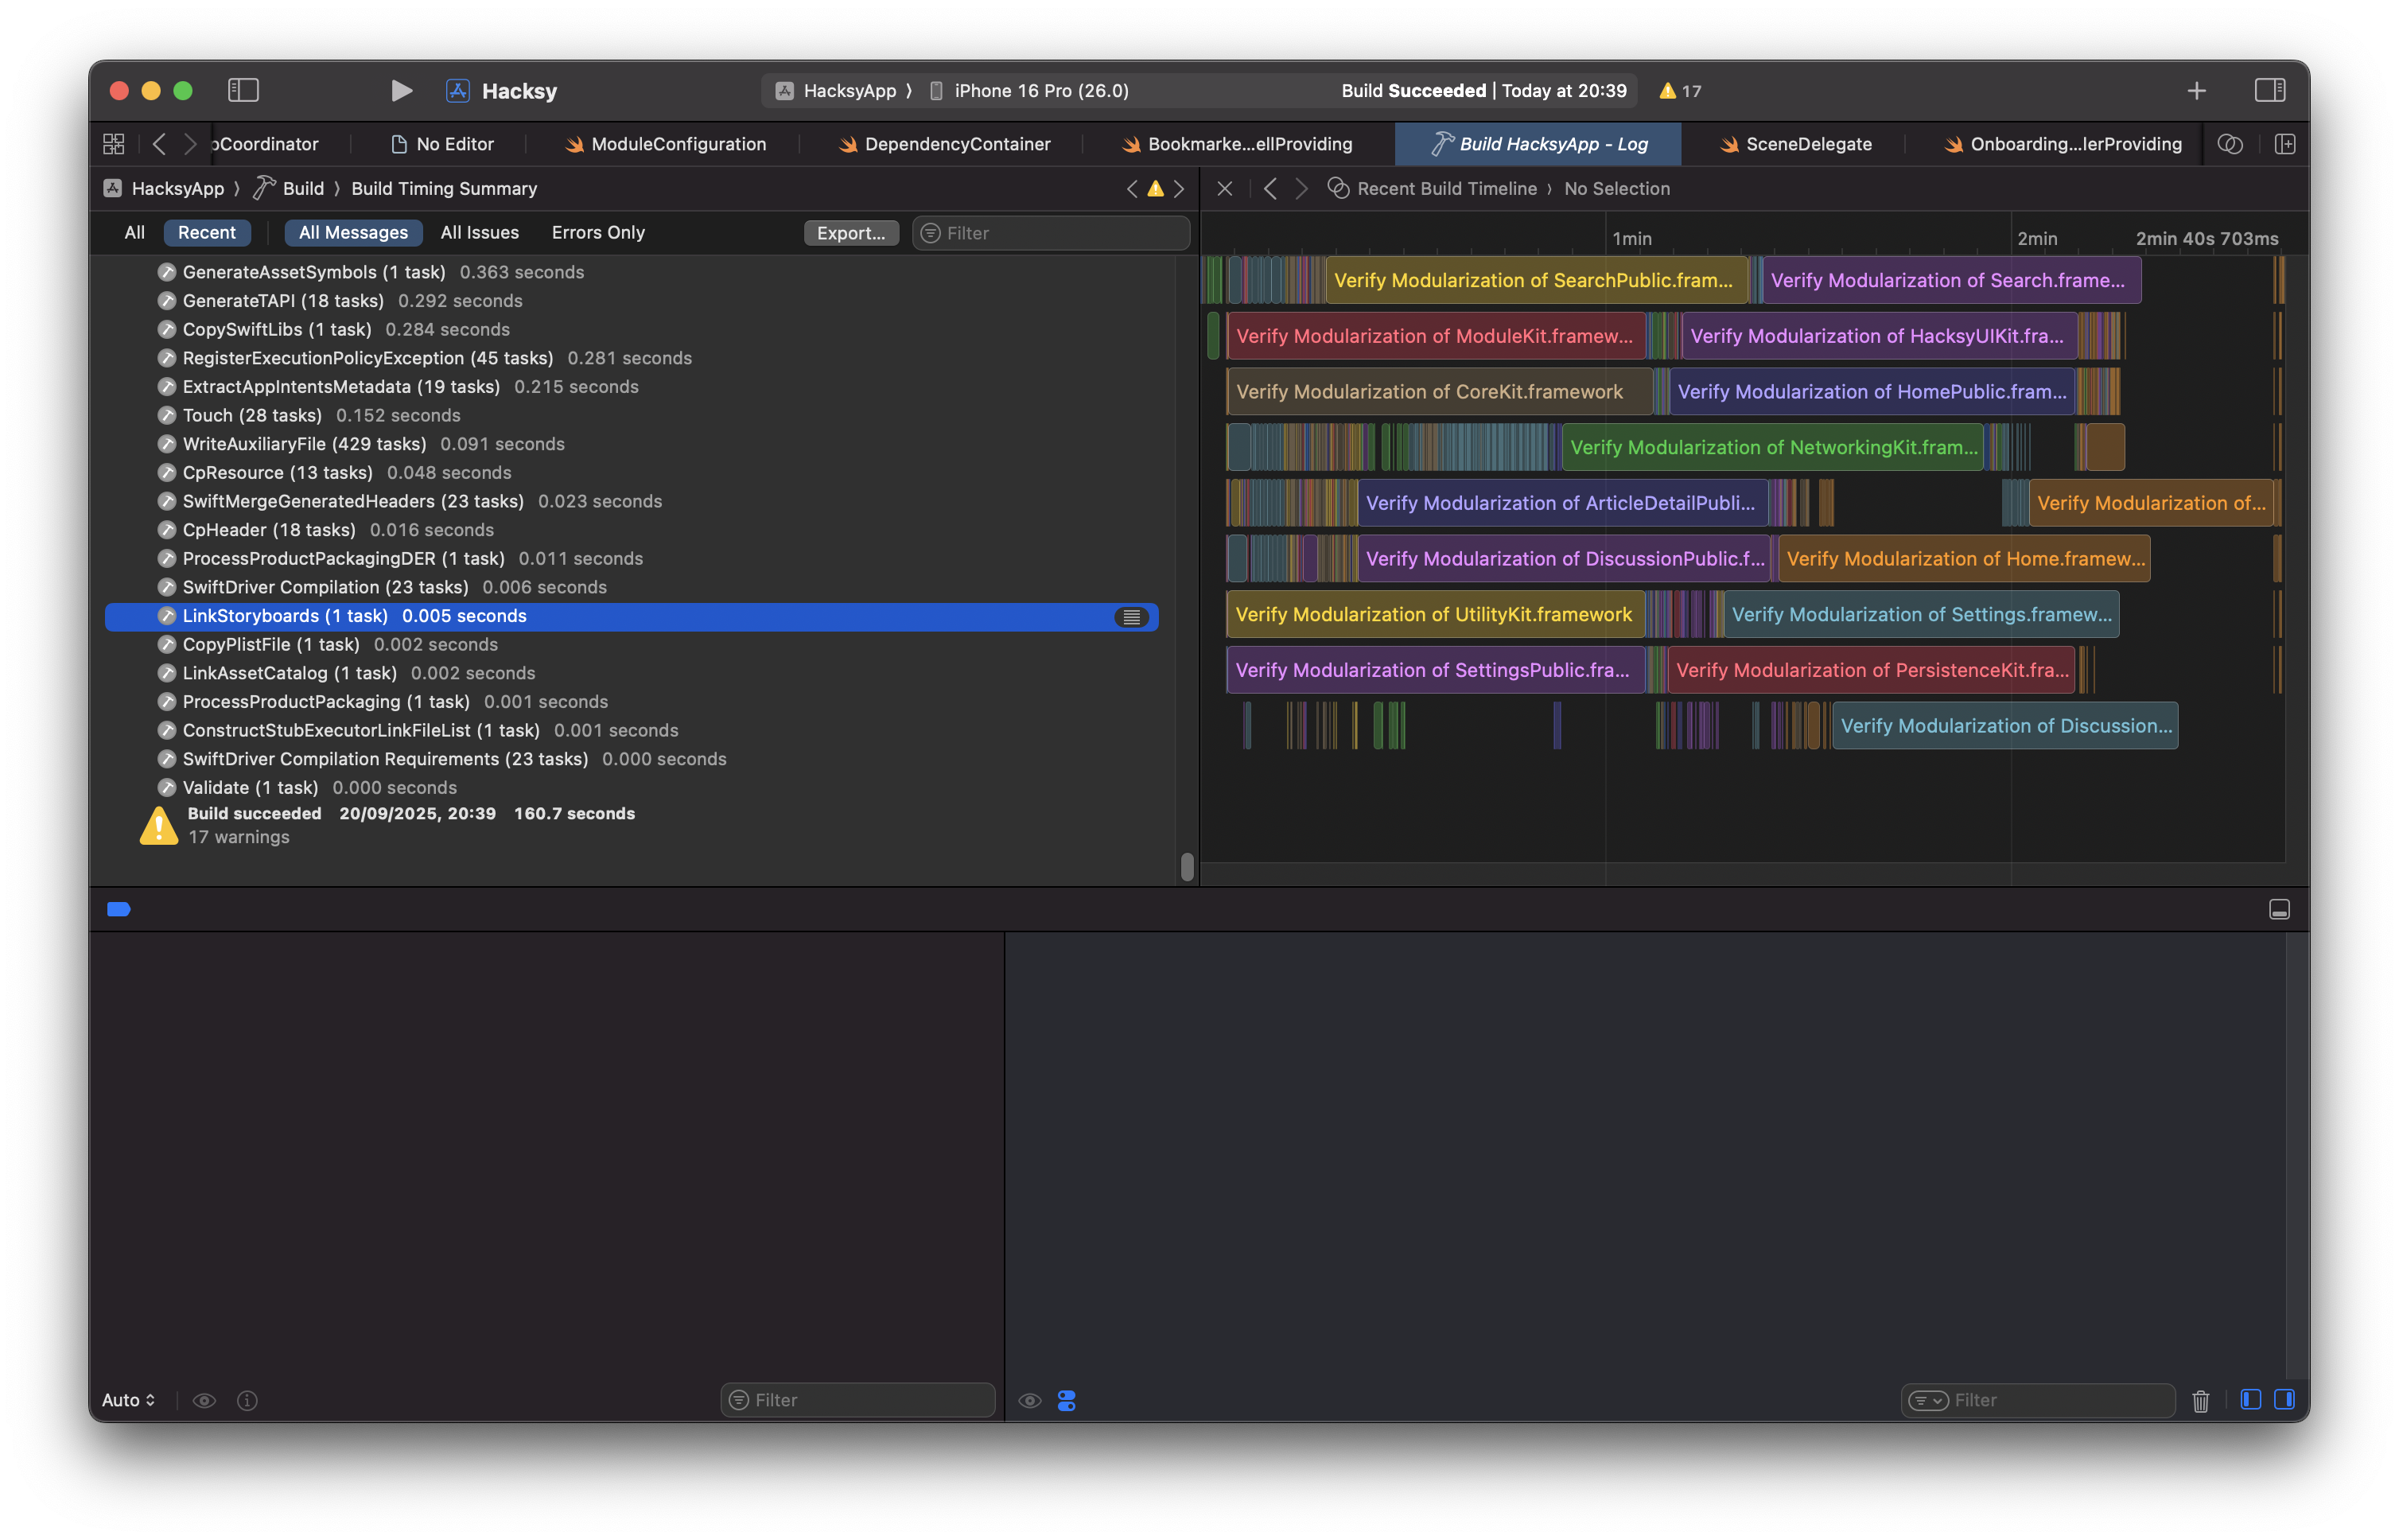
As you can see the build took 160.7 seconds, not the end of the world, but when you consider that it’s a small-to-moderate project, it’s quite a while. I tried playing around with the flags in Build Settings, but it really didn’t bring me any closer to a better result.
For the “Bazel test run”, I first wiped everything out using the bazel clean --expunge command, and then built the project using this command bazel build //:HacksyApp --show_timestamps. Here are the results:
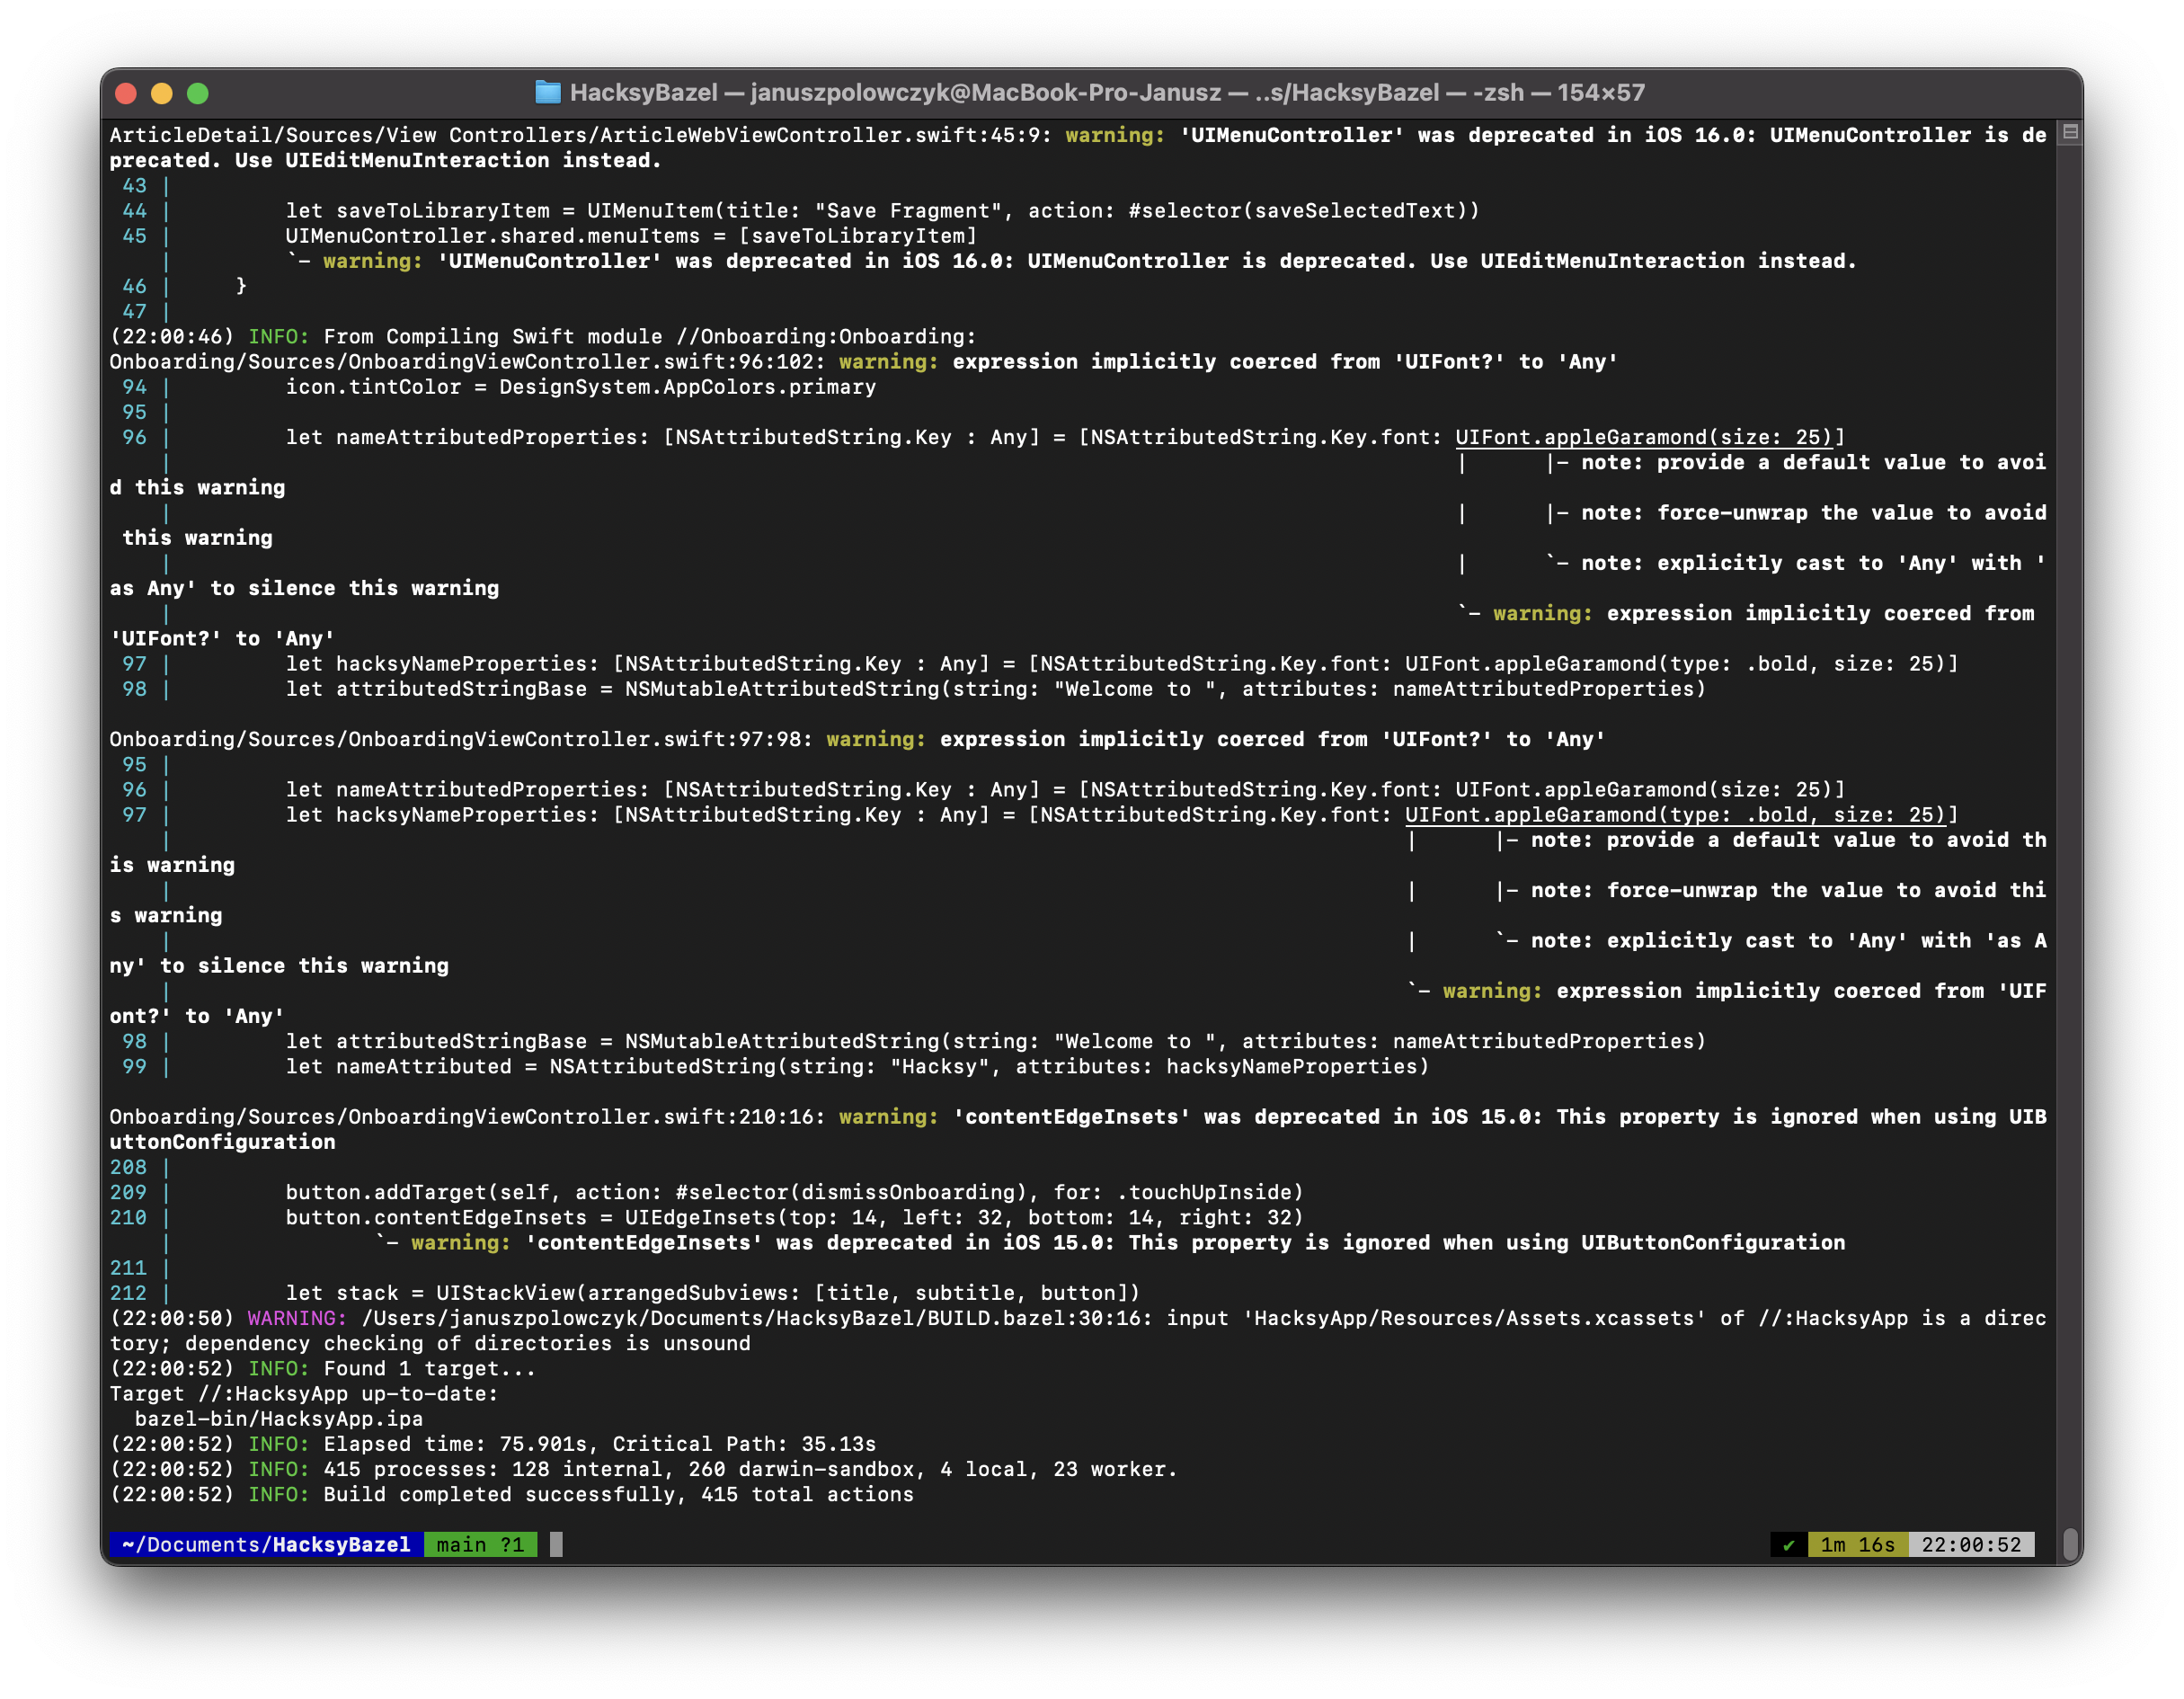
Elapsed time: 75.901s, Critical Path: 35.13s
One might be skeptical that I did some tinkering with Bazel, as there is over an hour difference between the tests, but I ran the tests again just before wrapping this article up and Bazel is still beating Xcode build times comfortably:
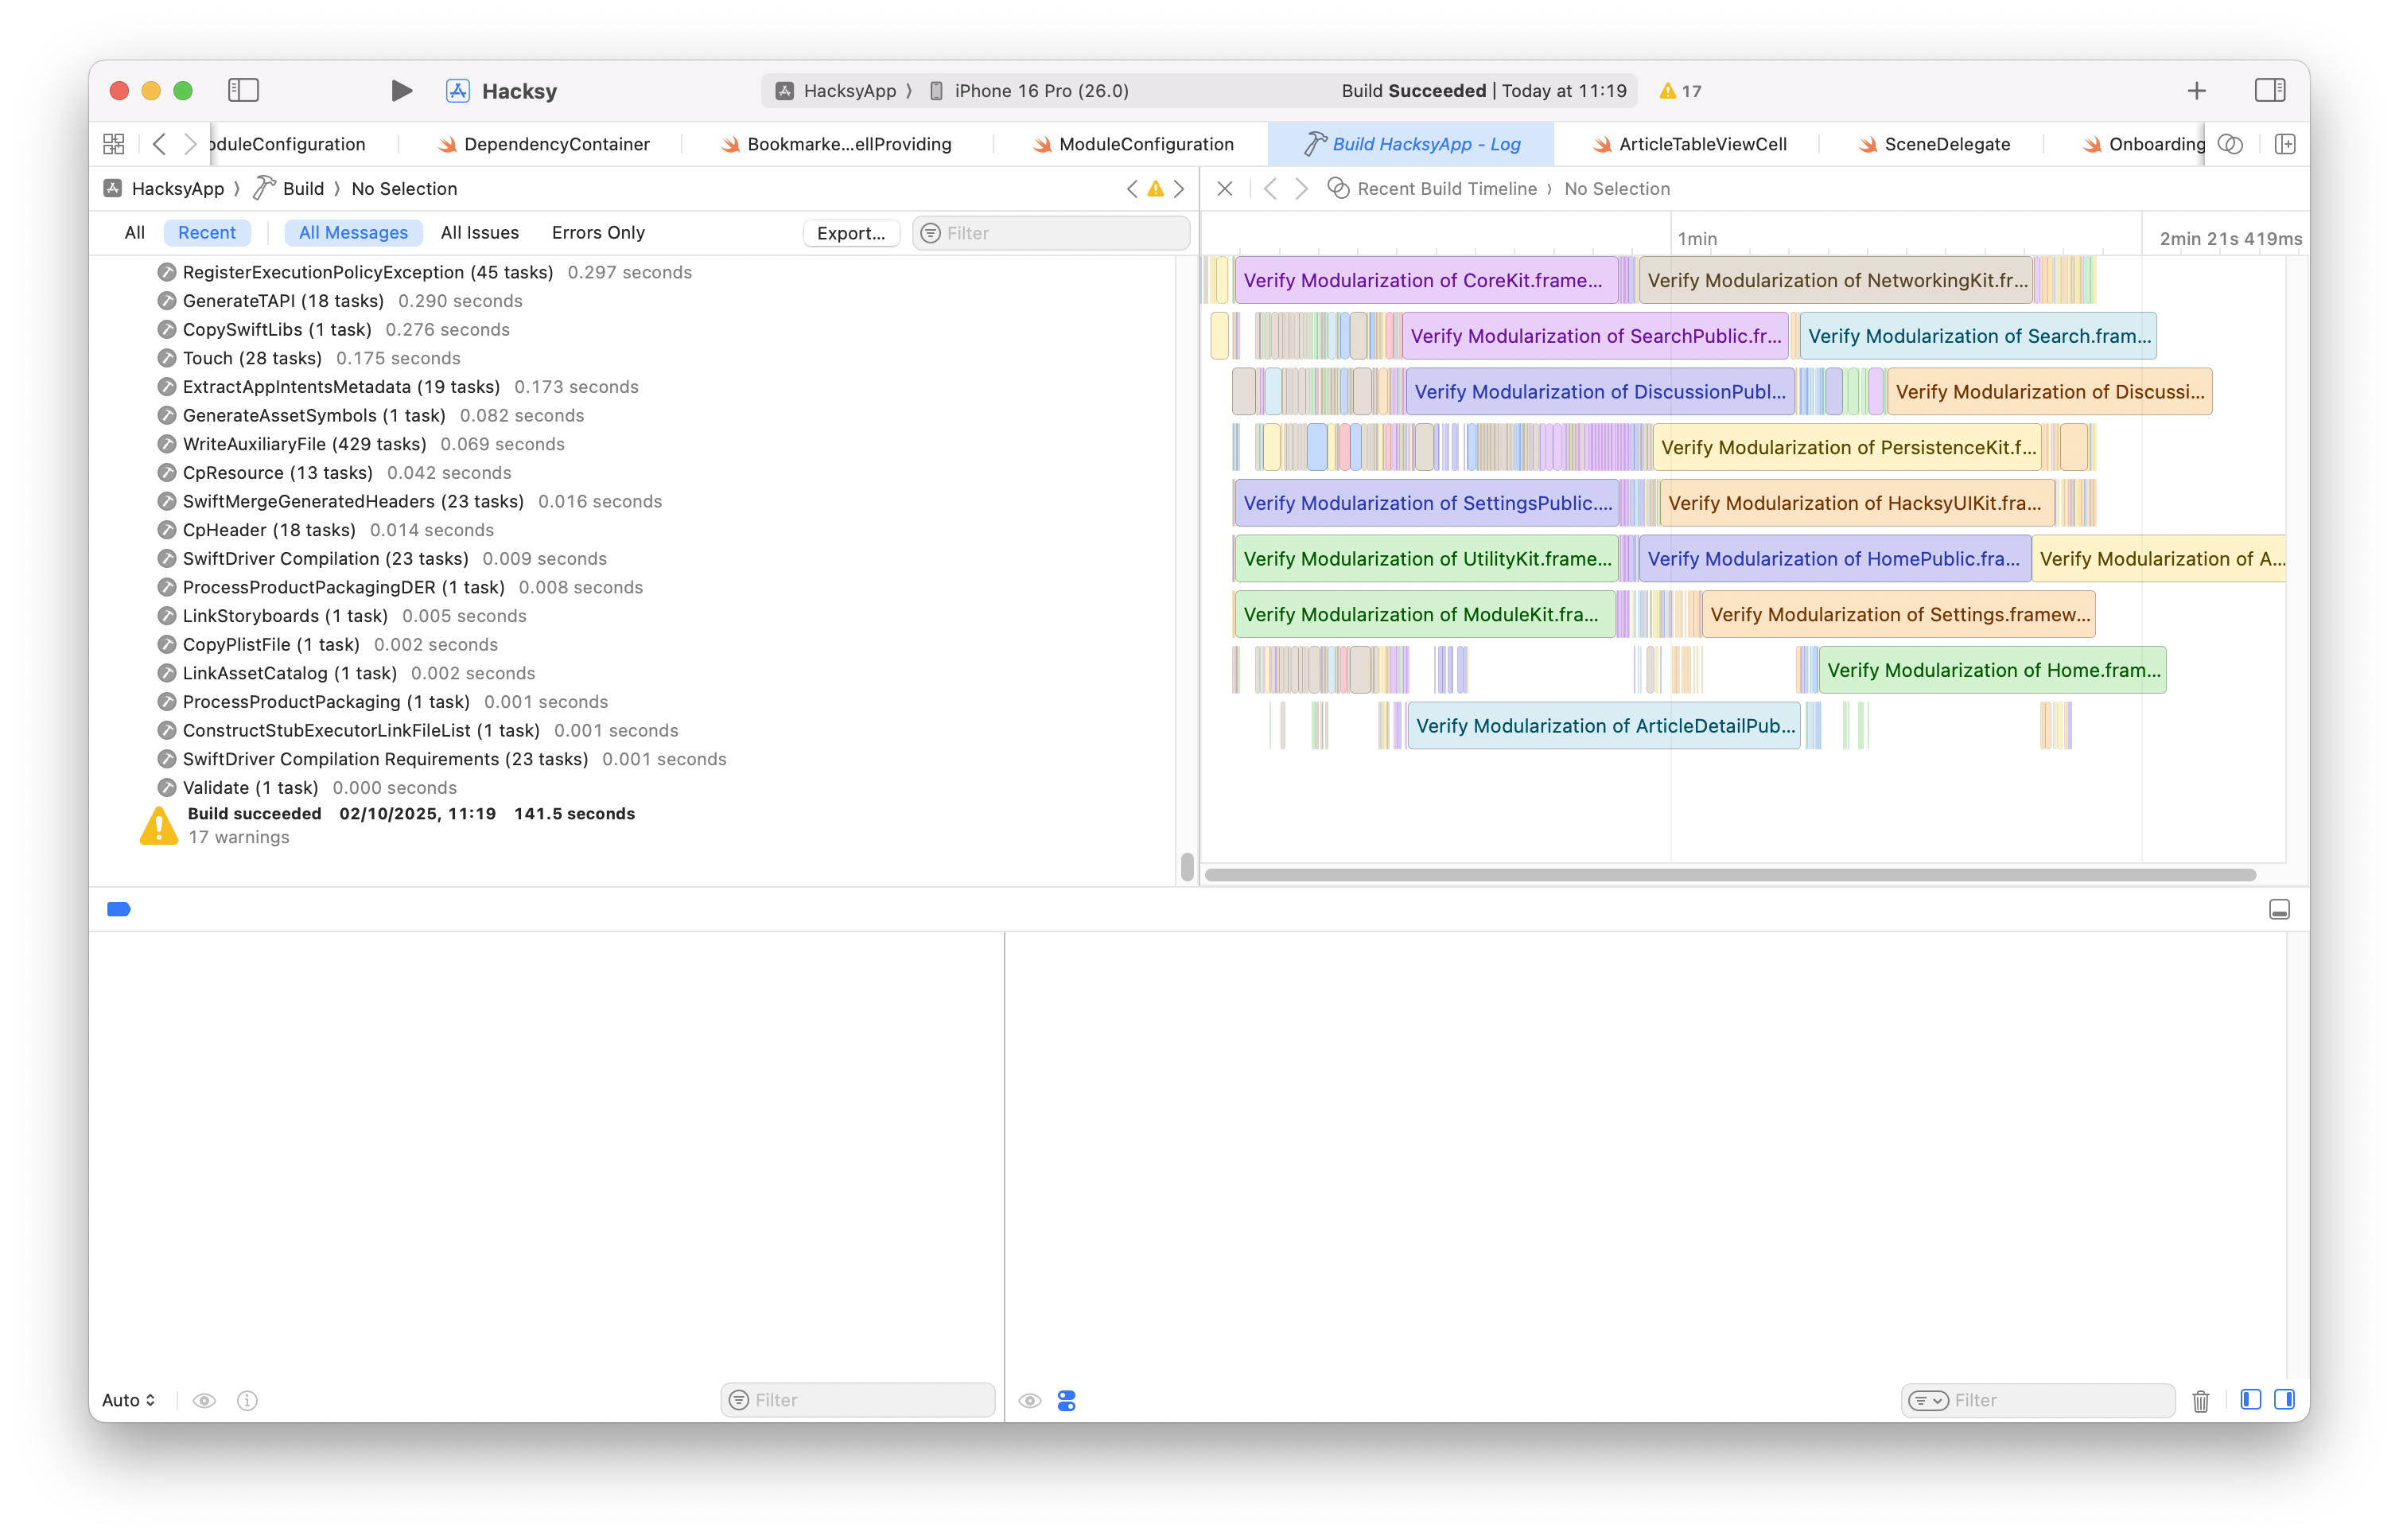
Build succeeded: 141.5s
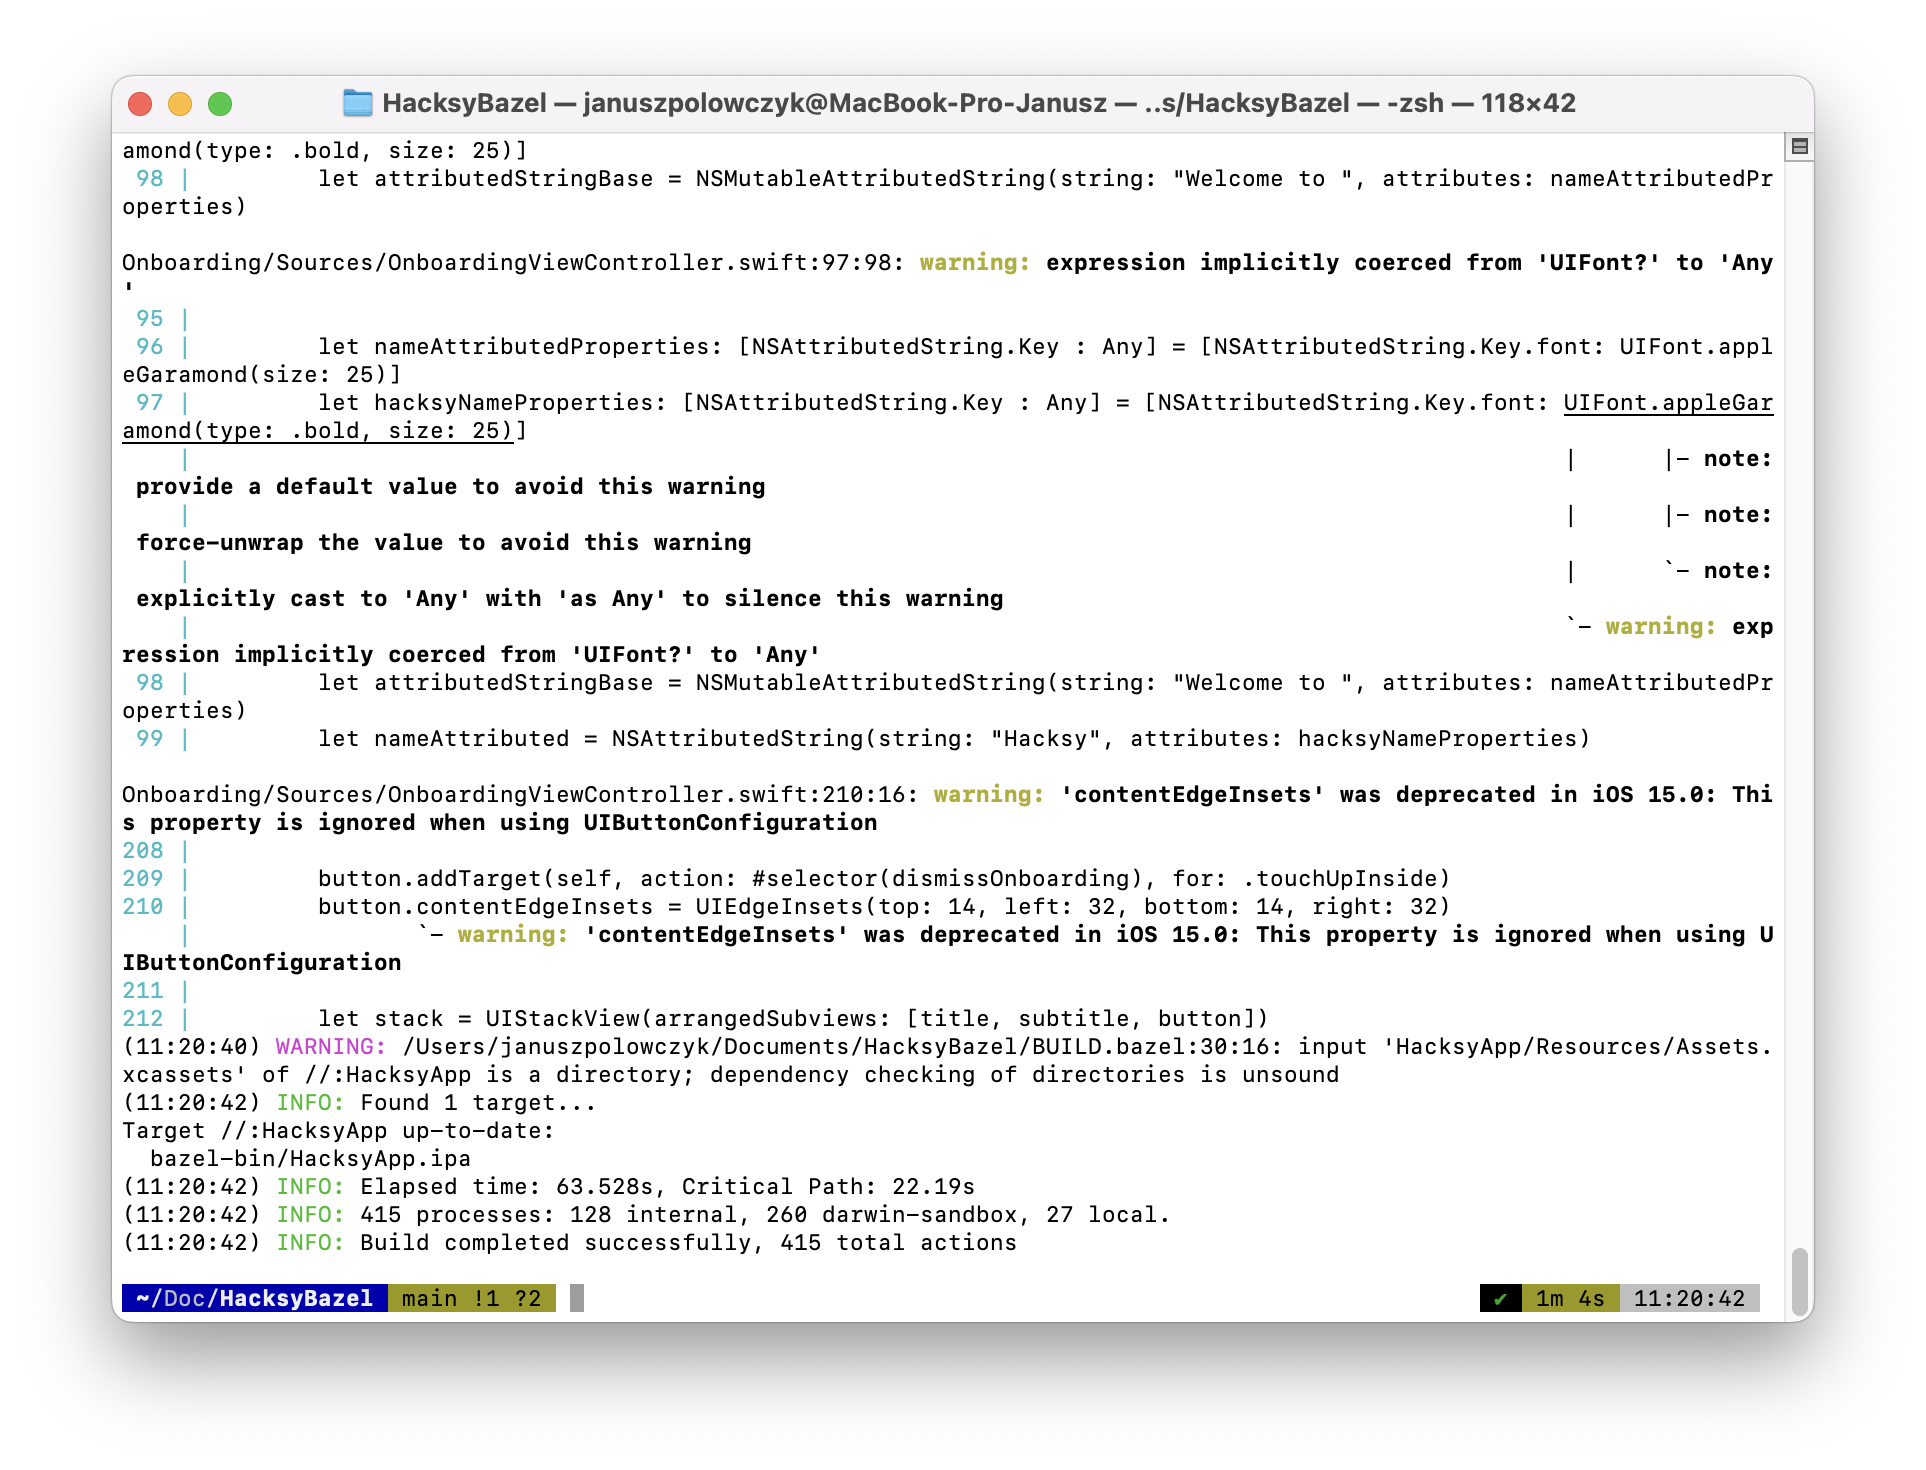
Elapsed time: 63.528s, Critical Path: 22.19s
As you can see, by using Bazel I cut my (clean) build times by ~54%. I was incredibly impressed the first time I saw the difference between the two. But that’s when you wipe almost everything out. What about the times, when you only make a small change (and the project was already fully compiled before), i.e., incremental build times? Here Bazel once again shows its speed. It’s about 49% faster when compared to Xcode.
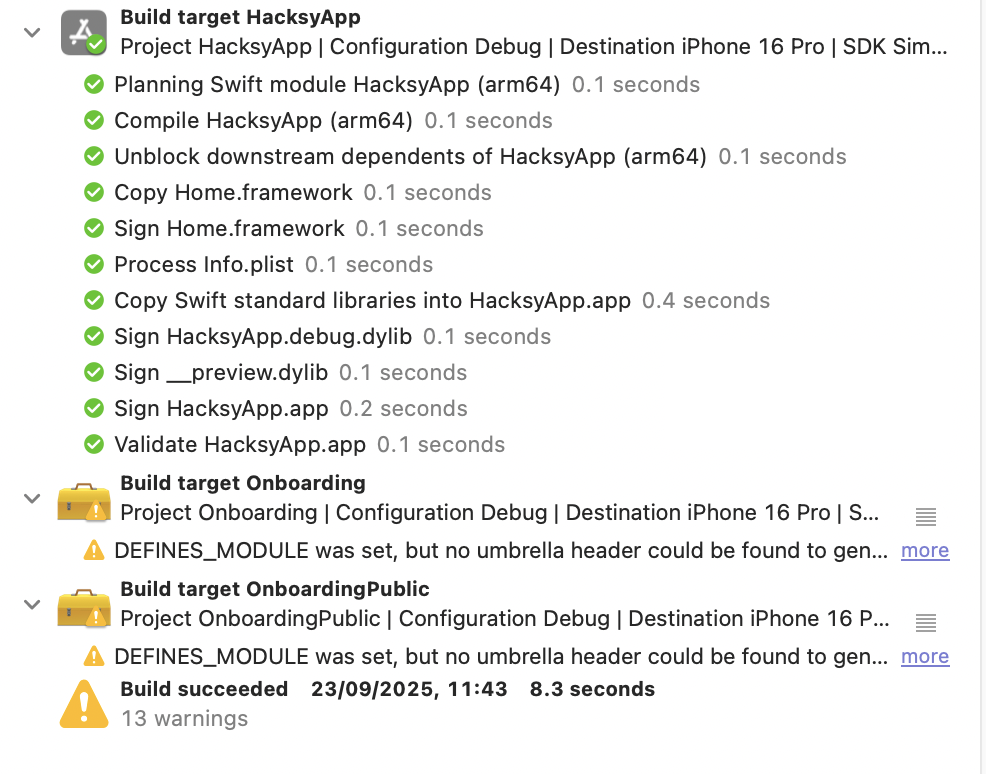
Build succeeded: 8.3s
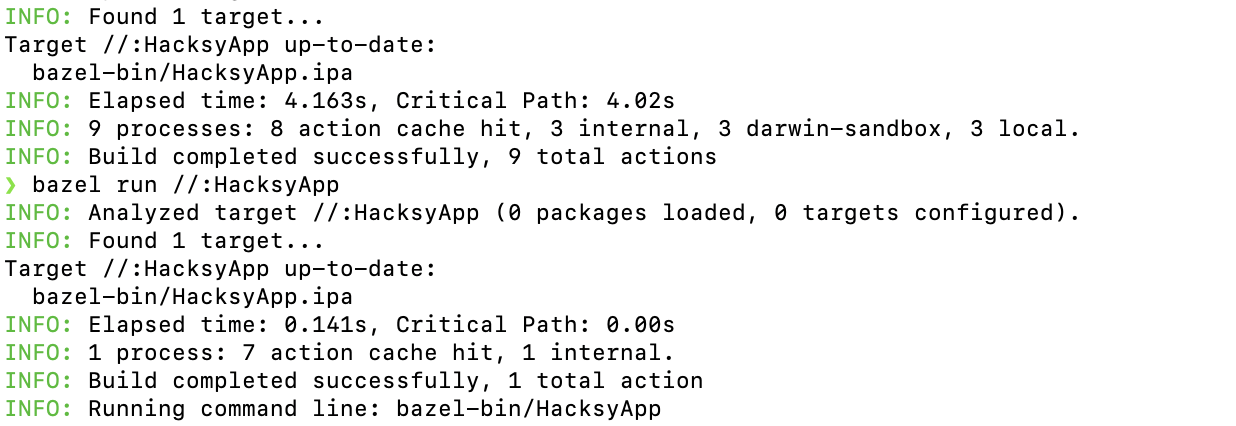
Elapsed time: 4.163s, Critical Path: 4.02s (next numbers you see are when I just ran the simulator after building)
In general, I find the results fascinating. It’s the same code throughout, but “only” a different build system and it really changes the game. You can imagine that in large-scale apps, it makes a world of a difference. I can definitely say that during my internship using Bazel greatly helped in navigating (and building) the massive codebase, but still, I was largely unaware of the actual benefits of using such system. It wasn’t until one and a half year after my internship, when I stumbled upon the post from Meta engineering blog where they described how Facebook app for iOS is built and that if it wasn’t for “heavy caching from the build system, engineers would have to spend an entire workday waiting for the app to build.”
So… Was it Worth the Hassle?
In short, yes. It’s a lot of work that you have to put in setting up Bazel correctly in the beginning, but once you have everything in place, the satisfaction of setting up—and using—a complex build system is really something else. I was ecstatic when I saw the app running after all the struggles I had. What made it even better is the clear benefit of using a build system like Bazel. Imagine if I had spent all this time on setting up something that would yield similar or worse results than the already working solution. I’d definitely learn something, but I’d seriously doubt if it was worth all that time and frustration.
Another thing that this project made me realize, was also something that I briefly touched upon in one of the segments here, i.e., how much complexity is actually hidden from programmers on a daily basis. I never had to think about explicitly adding UIKit as a dependency of a module in an iOS project. My understanding was that I only had to import the framework and I could call it a day, it’s an iOS project after all!
Implementing a build system like Bazel requires you to change your thinking quite substantially. One interesting mistake that I made when migrating from Xcode to Bazel was that I had a private module listed as a dependency in another module (probably added by accident). Xcode was more than happy to compile the project and run the app. Bazel, on the other hand, stopped the building process and threw an error, saying that the visibility of a module is private and it cannot be imported as such. It really, really forces the clean architecture boundaries ruthlessly, which is a great thing.
Closing Thoughts
Migrating to a build system like Bazel was probably one of the most interesting things that I did in a while. It challenged my assumptions and got me out of a bit of a rut when it comes to creating apps. What I mean by this is that I had to carefully think about what I do and how the thing that I am currently working on impacts other parts of the app. One messy building block may collapse the whole structure after all. Also, it’s important to touch upon one thought that I had throughout, which is the humbling aspect of computer science as a domain: You think you have a grasp on it, and then you discover that there is much more depth to this field than you could possibly imagine. The “unknown unknowns” that you eventually discover can really put you back in your place. But that’s also the nice part about all of it, there’s always something to learn and broaden your horizons.
I really hope that you got something out of this lengthy article and found it informative. I certainly found a lot of enjoyment in this project and plenty of things to study for the near future!
Janusz
P.S. I’d love to hear what you think about this article! If you find any errors, inconsistencies, or stuff that is just plain idiotic and doesn’t make any sense from the engineering perspective, or how Bazel works, please, please, tell me! I want to learn more about the things that I do and improve.